NestJS 예외 처리 (Error Exception)
NestJS에 내장된 예외 처리 레이어와 커스텀 Exception Filter를 활용하는 방법을 알아봅니다.
NestJS 예외 처리 (Error Exception)
 NestJS Exception Handling
NestJS에는 애플리케이션 전체의 모든 예외 처리를 하는 Exceptions Layer가 내장되어 있습니다. 애플리케이션 코드에서 예외 처리를 하지 않으면 이 레이어에서 예외를 처리합니다.
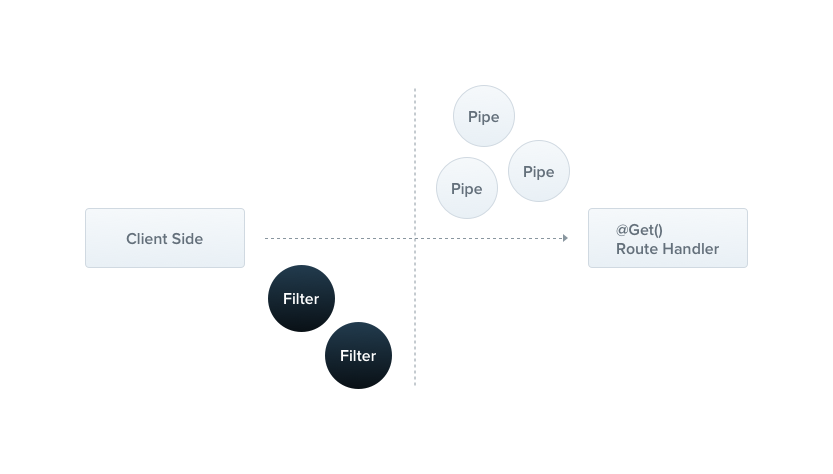 NestJS Exception Layer 동작 구조
커스텀으로 예외 레이어를 만들지 않는다면 아래와 같이 기본 JSON 응답을 합니다.
1
2
3
4
{
  "statusCode": 500,
  "message": "Internal server error"
}
Exception Filters
기본 예외 필터가 자동으로 많은 경우의 예외 처리를 해주지만 custom으로 제어를 하고 싶은 경우가 있습니다. 예를 들어 다른 형태의 JSON 스키마로 반환하고 싶은 경우입니다.
1
2
3
4
5
6
7
8
9
10
11
12
13
14
15
16
17
18
19
20
import { ExceptionFilter, Catch, ArgumentsHost, HttpException } from '@nestjs/common';
import { Request, Response } from 'express';

@Catch(HttpException)
export class AllExceptionFilter implements ExceptionFilter {
  async catch(exception: HttpException, host: ArgumentsHost) {
    const ctx = host.switchToHttp();
    const response = ctx.getResponse();
    const request = ctx.getRequest();

    const status = exception ? exception.getStatus() : HttpStatus.INTERNAL_SERVER_ERROR;

    response.status(status).json({
      statusCode: status,
      timestamp: new Date().toISOString(),
      path: request.url,
      message: exception.message,
    });
  }
}
@Catch(HttpException)은 http 통신의 예외를 캐치하겠다는 뜻입니다. 모든 예외를 캐치하고 싶다면 @Catch()로 적용하면 됩니다.
Usage
컨트롤러 전체에 적용
1
2
3
4
5
6
@UseFilters(AllExceptionFilter)
@Controller('user')
export class UserController {
  constructor(private userService: UsersService) {}
  // ...
}
특정 라우팅 핸들러에만 적용
1
2
3
4
5
6
7
8
9
10
@Controller('user')
export class UserController {
  constructor(private userService: UsersService) {}

  @UseFilters(AllExceptionFilter)
  @Get()
  async find() {
    // ...
  }
}
적용 결과
1
2
3
4
5
6
{
  "statusCode": 401,
  "timestamp": "2022-10-21T08:04:19.635Z",
  "path": "/api/v1/test",
  "message": "여기에 에러 메시지가 들어옵니다."
}
이렇게 커스텀 Exception Filter를 만들면 에러 응답 형식을 원하는 대로 통일할 수 있어요.
This post is licensed under CC BY 4.0 by the author.